Как сделать размытие по краям в adobe premiere
Добавил пользователь Евгений Кузнецов Обновлено: 03.09.2024
как сделать размытые полосы по краям видеозаписи в adobe premiere pro cs6. работ

04:24
03:31

05:41

05:02
02:29
![Oliver Tree & Little Big - The Internet [Music Video]](https://i.ytimg.com/vi/5Og1N-BVSwg/0.jpg)
03:36

04:43
Убрать чёрные полосы можно поставив галочку "repeat edges" в настройках эффекта fast blur.
Борис Clean
Правильно я понимаю, что этим эффектом по горизонту, можно сделать видео под широкоформатный фильм? А если в фотошопе две полоски сделать цветные и размыть, по градиенту?
Nickyerro
Ого спасибо, я не знал этого
Золотое Хобби
Здорово, спасибо за понятное объяснение!
PROSTO VA
RiDDan
Спасибо большое
Viacheslav Pro
Данрик Б.
Это что за халтура? Размытие по краям нужно для плавного исчезания кадра, а не контрастного стыка слоя 1 и 2, где один мутный, а второй четкий. Переход от фокуса к расфокусировке должен быть незаметным.
Линфелд
Не проще пользоваться эффектом Crop?
Bego Khalifa
а как можно сделать чтобы там вместо рамки было видео , как в музыкальных клипах ?
Виньетки дают возможность ненавязчиво привлечь внимание зрителей к определенному объекту в кадре (например, к человеку или элементу ландшафта).

В Premiere Pro виньетки можно создавать следующими способами:
Вот как создать виньетку:
Выделите клип на таймлайне.

This sample file is an Adobe Stock asset you can use to practice what you learn in this tutorial. If you want to use the sample file beyond this tutorial, you can purchase a license on Adobe Stock. Check out the ReadMe file in the folder for the terms that apply to your use of this sample file.
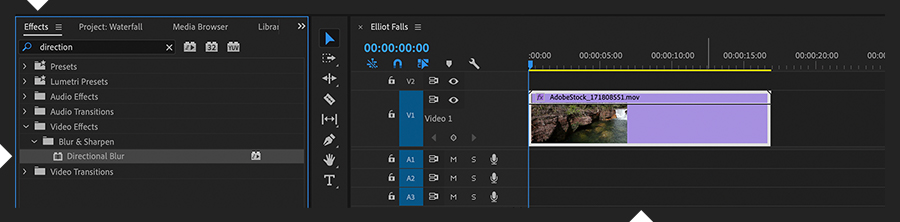
Once you’ve identified the area of movement that you’d like to improve by adding a slight amount of motion blurring, open the Effect Controls panel (Shift+5) and draw a Directional Blur mask around the subject in the Program Monitor, using whichever masking tool works best. It may help to increase the Zoom level of the Program Monitor. Leave the effect’s settings at their default values for now. If your shot is static, you can skip the next step.

If the area of interest moves across the scene, track the mask to follow it accordingly. Click the Track Mask directional arrows, stopping as necessary to readjust the mask in case it drifts. Depending on whether your subject enters from offscreen, you may find it easier to start tracking in the middle of the clip and then go back and track in the opposite direction. Track one frame at a time to fine-tune mask tracking at the edge of the frame. Play the sequence to make sure the mask stays on target.

Adjust the Directional Blur values in the Effect Controls panel to suit the motion you’re blurring. Set the blur’s Direction to follow the action. Increase Mask Feathering if you need to soften the mask’s edge. Play the sequence, looping it so that you can fine-tune your adjustments and see the results in real time. You’ll find that a little Blur Length goes a long way.

Add more instances of the Directional Blur effect, or additional effect masks, as needed. Right-click to rename each one so you can identify them later.
With Adobe Stock, you have access to more than 100 million high-quality, royalty-free images including photos, graphics, videos, and templates to jump-start your creative projects. Try Adobe Stock and get 10 free images.
Для чего нужен блюр
Блюр – это эффект размытия. С его помощью, вы можете полностью размыть ваше видео, можете размыть какой-нибудь отрезок на вашем видео, а можете размыть какой-нибудь участок. Данный эффект накладывается, когда вам нужно что-то замазать на ролике. Например, чтобы не нарушать чьи-то авторские права или скрыть нечаянную рекламу. Да и вообще, такие видео намного лучше заходят зрителям, чем простые.

Заблюрить видео
Итак, изначально нам понадобится какой-нибудь ролик. Берем первый попавшийся, в свободном доступе, загружаем его в программу и на таймлайн.


Этот эффект нужно будет перетянуть на таймлайн, наложив на ваше видео. Мы делаем это со своим примером.

Где размытость – нужно поставить цифровое число. Таким образом ваше видео заблюрится и этот эффект будет продолжаться всю длину видео.

Если вам блюр нужен на определенном отрезке видео, то, то справа от размытости – можно поставить точку. Там есть собственная временная линия, где этих точек вы сможете наставить столько, сколько вам нужно.
Ну а если же вам нужно заблюрить какой-то определенный участок, на видео, то тут же выбираете маску, и уже на самом видео вы регулируете ее размеры.

На этом наш урок подходит к концу. Спасибо, что остаетесь с нами, всем удачи и до новых встреч.

Читайте также: